
Run, Cypress, run!
Test automation enthusiast. I can't fix your TV.
Testing with Cypress is fun - let's start from there. The tool itself is modern, fast, and reliable. It has comprehensive documentation and was built to cover most of the pain points other automation tools of the past had. It's open-sourced and with all that in mind, it's understandable why Cypress is a popular choice, with a buzzing and motivated community.
You can check out what my colleague Klaus wrote after giving Cypress a go.
What role does an alive and striving community play for Cypress, and us? Firstly, StackOverflow is packed with questions and answers regarding all the possible examples you can imagine. Secondly, there are plenty of Cypress plugins out there built by the community members, like you and I. Plugins are extensions for Cypress that give you the possibility to use Cypress beyond its vanilla bounds, speeding up or extending the testing process. From out-of-the-box database support, over visual regression, and all the way to the plugin that we are going to build right here, right now.
One might think: "Hey, first I need to be a Cypress expert if I'm to write a Cypress plugin, ain't nobody got time for that". While being an expert in the matter would help, it's not a must-have in order to write a Cypress plugin.
Actually, creating and publishing a Cypress plugin is pretty easy. Let me demonstrate that in this post.
Arrange
Before we start, here's a list of things you'll need preinstalled to create a Cypress plugin:
- node installed (it comes together with
npm, which we'll use to publish our plugin) - ...
Actually, that's it, that's the whole list.
We can break down the plugin writing into two major parts:
- a problem worth solving, and
- a code that solves that problem.
As you might imagine, finding a problem worth solving, one that's preferably not already solved a million times, is hard, I'll give you that. This is something you'll have to figure out on your own. For this blog's sake, I'll pretend that Cloudflight wants Cypress to output the Cloudflight logo in the console whenever a cypress run command is invoked as a solution that will be easily reused across different projects. Pretty handy, right?
Act
We'll start by creating a new folder cypress-cloudflight and start our npm package there. As with any other npm project, let's start with a very simple package.json file:
{
    "name": "cypress-cloudflight",
    "version": "1.0.0"
}
You'll add here a bunch of stuff like description, author and license info, repository link, keywords, and such, though we will use only the bare minimum needed to get the plugin published to npm.
A quick google search says there's a bunch of npm packages that print images to console, so we'll just reuse one of those as there's no need to write everything from scratch.
This terminal-image package looks promising at first glance, so let's give it a go. Run npm install terminal-image. This will add a dependency in our package.json file with the latest released version (2.0.0 at the moment of writing).
The package readme says we can use it just with these two lines:
import terminalImage from 'terminal-image';
console.log(await terminalImage.file('unicorn.jpg'));
Let's tailor this to our needs and test it. First, create an index.js file in the project root and add these two lines. Running it like this will produce the following error: SyntaxError: Cannot use import statement outside a module. Just add "type": "module" to the package.json file to fix it. Let's also change the file name from unicorn.jpg to cloudflight.png, add the logo image of the same name to the project root and execute the code.
In the terminal run node index.js and lo and behold, we solved half of our problem:
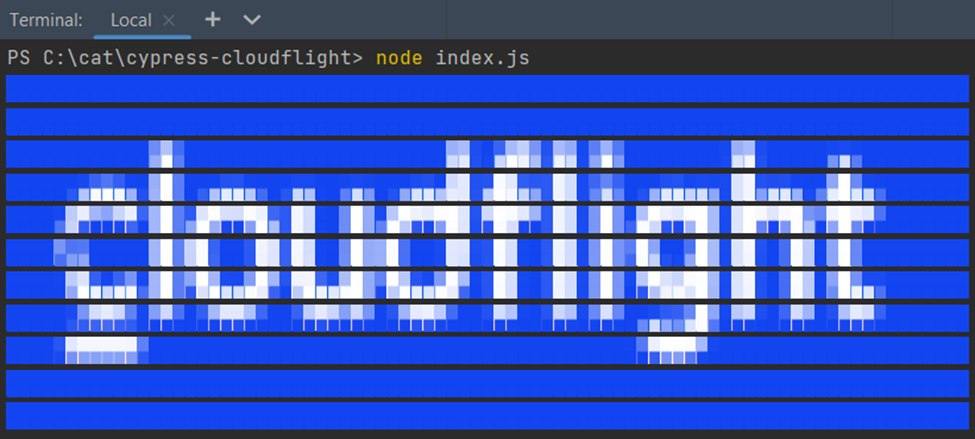
My dear friends, just look at that beauty.
Let's put this into Cypress context. We wanted to output this logo whenever any Cypress tests were started. To do that we'll need to listen to Cypress before:run event. Let's encircle the console.log within the cloudflightPower function, export it and inside listen to the Cypress before:run event. Hardcoding image name like that won't really do the trick, as packing assets doesn't work that way in npm. Luckily there's an easy workaround using import.meta which properly exposes our logo to any package that installs it. The resulting code is this:
export const cloudflightPower = async (on) => {
    on('before:run', async () => {
        const logoPath = new URL('./cloudflight.png', import.meta.url);
        console.log(await terminalImage.file(logoPath));
    });
}
Let's break it down: on is the Cypress function we'll use to register listeners to various events, which gives us an option to run arbitrary code when those events are emitted by Cypress. In this case before:run will emit before any tests are started and execute our code. on will be provided as a parameter whenever somebody imports our plugin into their project.
The next line needs no introduction, the famous console.log(). Inside it, we run the terminal-image code that will load the image and output it to the console.
Assert
To check if this works we'll set up a demo Cypress project called cypress-demo right next to the cypress-cloudflight project. npm allows installing local packages for testing purposes, so let's go ahead and do that, create a package.json file with this content:
{
  "scripts": {
    "cypress:open": "cypress open --browser chrome --e2e",
    "cypress:run": "cypress run"
  },
  "dependencies": {
    "cypress": "10.2.0",
    "cypress-cloudflight": "../cypress-cloudflight"
  }
}
Run npm install followed by npm run cypress:open. This will start Cypress runner and auto-generate some Cypress configuration files. You may close the runner, we don't need it anymore.
Next, open the generated cypress.config.js file, and inside the setupNodeEvents function, import the cloudflightPower function from the cypress-cloudflight project using a dynamic import, and execute it by providing the on parameter. The resulting cypress.config.js file should look like this:
const { defineConfig } = require("cypress");

module.exports = defineConfig({
  e2e: {
    async setupNodeEvents(on, config) {
      // implement node event listeners here
      const {cloudflightPower} = await import('cypress-cloudflight');
      cloudflightPower(on);
    },
  },
});
Note that you should add async in front of the setupNodeEvents method as it allows using await for the dynamic import.
The last thing we need is a simple test file to run. Inside the cypress folder create another e2e folder, and within it a test.cy.js file with the following content:
it('demo test', () => {
});
This test won't do anything, but it will be enough for our example.
Start Cypress tests by executing npm run cypress:run and watch the magic. If everything was done right, you should again see the Cloudflight logo in the console.
Now, most of the hard work is finished here. The next step is to write a README.md file explaining how to set up and use your plugin, publish it to npm, and "inspire" all your colleagues to use it. All of them. No exceptions.
Go over to the npm home page and register an account if you don't have one. Open the terminal from the plugin root folder and run npm adduser. Follow the authentication instructions. After that run npm publish, and your plugin will be published to the npm. You can even fork cypress-documentation repository and add your plugin to the list for everyone to see.
Conclusion
And that's it, that's everything you need. The example plugin we just made is already published, and you can install, test, and, inspect the code inside. Just run npm install cypress-cloudflight and run some Cypress tests.
Hope this article shows just one of the reasons why Cypress became as popular as it is. Now go out there and write some amazing plugins!
Happy testing!