
Microsoft Power BI
Transform Your Data into Actionable Insights!

(Written in collaboration with Andreas Schweiger & Stefan Starke)
In today's data-driven world, organizations big and small rely on data to make informed decisions, gain insights, and drive business growth. However, raw data alone is seldom enough; it needs to be transformed into actionable information. This is where Power BI steps in, offering a powerful suite of tools to analyze, visualize, and share data.
Before looking into the possibilities and techniques on how to embed Power BI reports - which is one of the most important questions in our custom software projects, let's have a brief look at the question:
What is Power BI and which key features does it offer?
In brief, Power BI is a business intelligence and data visualization tool that enables users to turn raw data into interactive visual reports and dashboards. It provides a unified platform for data exploration, data preparation, data modeling, and data sharing. With its intuitive interface and robust capabilities, Power BI has become the go-to choice for organizations seeking to extract meaningful insights from their data.
To give an idea, let's look at a sample report (which can be downloaded here):
Key Features
1. Data Integration
Power BI connects to a wide range of data sources, including databases, cloud services, and on-premises data. It can seamlessly integrate data from Excel spreadsheets, SQL databases, DataVerse, Azure, and many more, making it easy to consolidate and transform data from various sources into a single dataset.
2. Data Transformation and Modeling
Power BI offers a powerful data modeling engine that allows users to shape and transform data using the Power Query Editor. This tool is particularly useful for cleaning, filtering, and structuring data before analysis. Users can create relationships between tables, define calculated columns and measures, and apply advanced transformations.
3. Interactive Visualization
One of Power BI's standout features is its ability to create stunning visualizations. Users can choose from a wide range of charts, graphs, and maps to display data in a compelling and informative way. The drag-and-drop interface makes it easy to create interactive dashboards that update in real-time as data changes.
4. Collaboration and Sharing
Power BI enables collaboration by allowing users to share reports and dashboards with colleagues or external stakeholders. The ability to share reports and collaborate on data analysis fosters a culture of collaboration within organizations, promoting better knowledge sharing.
5. AI and Machine Learning Integration
Power BI integrates with Azure Machine Learning, allowing users to embed machine learning models into their reports and dashboards. This enables predictive analytics, anomaly detection, automated insights generation, and a Q&A feature. It uses natural language processing to generate visualizations and answers based on the data available.
6. Mobile Access
With Power BI Mobile, users can access their reports and dashboards on smartphones and tablets. This ensures that decision-makers have access to critical data wherever they are.
Licenses
Choosing the right Power BI license is crucial for maximizing the benefits of this powerful tool while staying within a defined budget.
In general, licensing can be split into two main categories, user-based (Free, Pro, Premium Per User) and capacity-based (Premium, Embedded) licensing.
| License Type | Target Users | Description | Cost |
| Power BI Free | Anyone | It allows users to create reports and dashboards in Power BI Desktop, but it has limitations on sharing and collaboration. It's a good starting point for personal use or exploring Power BI's capabilities. | Free |
| Power BI Pro | Individual users who need to publish and share reports and dashboards within their organization | User-based license for report sharing and collaboration. | $9.99 per user per month |
| Power BI Premium | Organizations with larger user bases and more demanding requirements | It provides dedicated capacity for faster and more reliable performance. Pricing depends on the number of virtual cores and the amount of RAM allocated to the Premium capacity. | Variable, based on capacity and users. |
| Power BI Premium Per User (PPU) | Suitable for small to medium-sized businesses | User-based license that allows users to access premium features without the need for a full-scale Power BI Premium capacity. | $20 per user per month |
| Power BI Embedded | Developers and ISVs (Independent Software Vendors) | License for embedding Power BI reports and dashboards into custom applications. Pricing depends on the number of virtual cores and the amount of RAM allocated to the Premium capacity. | Variable, based on usage |
Integrating Power BI Reports
If you are already developing applications or webpages based on the Power Platform ecosystem (CLF Engineering Blog) then embedding a report into Power Apps is your way to go.
Integrating into Power Apps or Power Pages
This integration allows you to embed Power BI content directly into web pages hosted on a Power Apps Portal, providing a seamless user experience for external customers, or users who may not have direct access to Power BI. Within your Power Apps Portal, you can embed Power BI reports or dashboards into web pages. This can be done using the "Power BI" component or HTML iframe.
For more details, you can refer to the official documentation or our Cloudflight Engineering Blog.
Integrating into a Custom Application
For us - as a company developing custom software - the most interesting approach is to embed reports into other applications using Power BI Embedded.
To ensure that only authorized users can view embedded Power BI content, a robust authentication and authorization system is required and that is where Power BI Embedded Tokens come into play.
Power BI Embedded tokens are a type of security token that grants access to specific Power BI content. They are used to authenticate users and control their access to embedded reports and dashboards. Here's how they work:
Generate Token: When a user requests to view an embedded Power BI report or dashboard, the hosting application (our custom-developed applications) needs to authenticate the user with Power BI. It does this by requesting an embedded token.
Token Parameters: The token request typically includes parameters such as the user's identity and roles and the specific report/dashboard to be accessed. These parameters determine what the user is allowed to see.
Token Issuance: Power BI generates a token based on the provided parameters. This token is a temporary, time-limited access key.
Access Control: The token contains information about the user's permissions, roles and the content they are allowed to access. When the user tries to access the embedded content, the token is validated to ensure the user has the necessary permissions.
Expiration: Power BI Embedded tokens have a limited lifespan, which enhances security. Once the token expires, the backend must request a new one for continued access.
Let's have a look at the steps we implemented to acquire embedded tokens:
User Authentication: Firstly, the user of your web application goes through an authentication process within your web app using your chosen authentication method. This step verifies the user's identity.
Web App Authorization: Our web application, having successfully authenticated the user, utilizes a service principal to establish authentication with Azure Active Directory (Azure AD). This step grants our web app the necessary permissions for interaction with Power BI REST APIs by requesting an Azure AD token.
Embed Token Request: Our web application communicates with the Power BI Embed Token REST API operation, initiating a request for an embed token. This specific token defines precisely which Power BI content can be embedded within our application as explained above. In response to our request, the REST API provides our web application with the embed token, which is specific to the requested Power BI content.
Passing the Embed Token: Our web application then securely passes this embed token to the user's web browser, allowing the user's browser to facilitate the interaction with Power BI.
User Access: Finally, the web app user employs the embed token within their browser to access and interact with Power BI content, as authorized by the token's permissions.
Feel free to have a look at the source code provided by Microsoft to see how you can acquire an Azure AD token using a service principal and how to generate embed tokens.
Regarding the frontend integration, Power BI supports all major UI frameworks - Angular, VueJS and React.
<powerbi-report
    [embedConfig] = {{
        type: "report",
        id: "<Report Id>",
        embedUrl: "<Embed Url>",
        accessToken: "<Access Token>",
        tokenType: models.TokenType.Embed,
        settings: {
            panes: {
                filters: {
                    expanded: false,
                    visible: false
                }
            },
            background: models.BackgroundType.Transparent,
        }
    }}

    [cssClassName] = { "reportClass" }

    [phasedEmbedding] = { false }

    [eventHandlers] = {
        new Map([
            ['loaded', () => console.log('Report loaded');],
            ['rendered', () => console.log('Report rendered');],
            ['error', (event) => console.log(event.detail);]
        ])
    }
>
</powerbi-report>
Row Level Security
Row Level Security (RLS) in Power BI is a security feature that allows you to control access to data at the row level based on user roles and filters. This means you can restrict what data individual users or groups of users can see within a Power BI report or dataset.
RLS is typically implemented by creating user roles within your Power BI model. Each user role can have specific data access rules associated with it. User roles can be defined and managed in Power BI Desktop or through Power BI service.
To enforce RLS, you use filter expressions within user roles. These filter expressions are written in a DAX (Data Analysis Expressions) language and define which rows of data are visible to users in that role. Filter expressions can be as simple or complex as needed, allowing you to create dynamic filters based on user attributes, such as username or department. You can find an example usage of DAX expressions where the users will see their data rows ONLY if the underlying data set has a record under their username.
RLS provides dynamic security, meaning that the data is filtered in real time as users interact with the report or dataset. Users will only see the data that aligns with their role and the applied filters. The filters can be applied to specific tables and roles as follows:
Once RLS rules are defined and tested, you can publish your Power BI report or dataset to the Power BI service. RLS rules are enforced in the service as well, ensuring consistent security across different platforms and devices.
Example of using RLS for filtering per person:
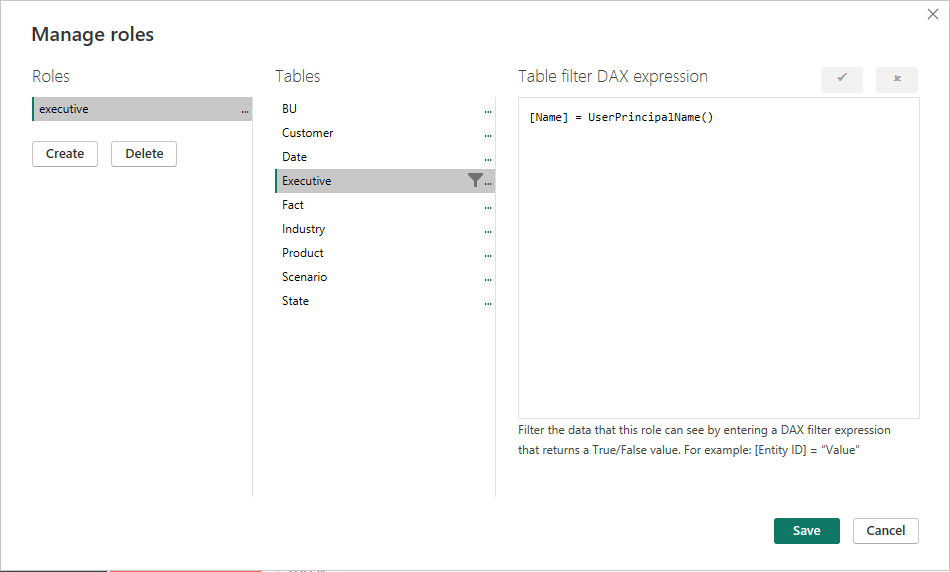
We want to filter everything in the sample report such that the logged-in executive can only see their data. For that, we will have to use USERPRINCIPALNAME() in DAX which will return the logged-in executive. Create a new measure on the table that has the executive names and name it "User" with the value USERPRINCIPALNAME(). Then, create the security role by clicking on the Modeling tab -> Manage Roles. Create a role and then define the filter. This filter simply means that the logged-in user will only see his/her records in the whole data set:
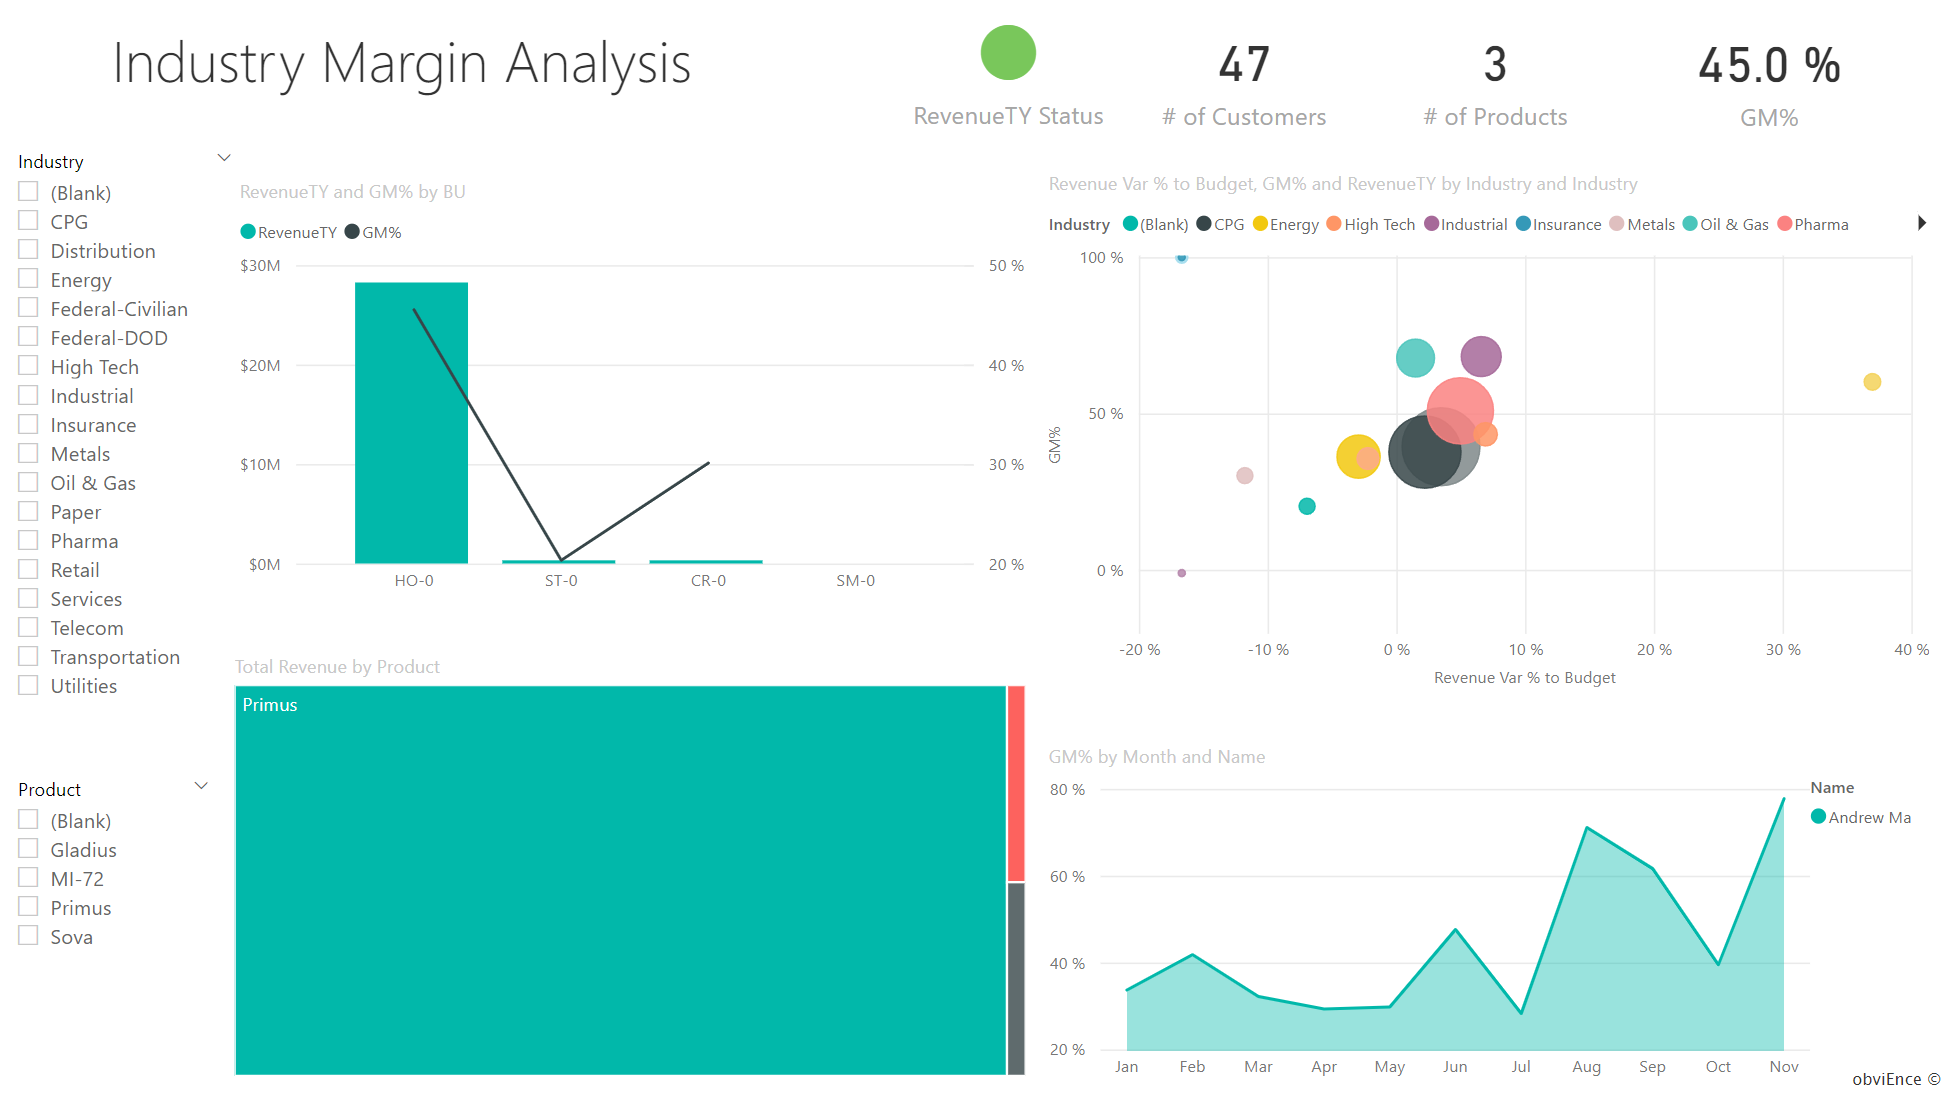
This is how the sample report looks when we view it as the executive "Andrew Ma" after RLS:
Example of using RLS to hide/show items depending on the security role:
A function to hide an entire page or specific elements in a report for certain roles is not available but there is a workaround on PowerBI Desktop. You can build your report as normal, then add a card and make it big, so that it overlays all the things you want to hide.
Warning: Note that this workaround would only visually hide the report from the UI and a malicious user would still have access to the data in the underlying dataset. Therefore, it should not solely be employed in combination with RLS when working with real data.
To do that, enter new data and create the following table:
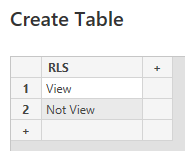
Create a new measure and write the following DAX which creates the message you want to display:
- Message = IF(HASONEFILTER('RLS Table'[RLS]), "You are not authorized!", "")
Create another measure and write the following DAX which controls the background of the overlay card we will create:
- Make Transparent = IF(HASONEFILTER('RLS Table'[RLS]), "#White", "#FFFFFF00")
Create a card and make it as big as the report page. Choose the "Message" measure to be displayed on it.
Format the RLS Table's visual in the general tab and find the background properties. Set the first dropdown to "Field value" and the second to "Make Transparent".
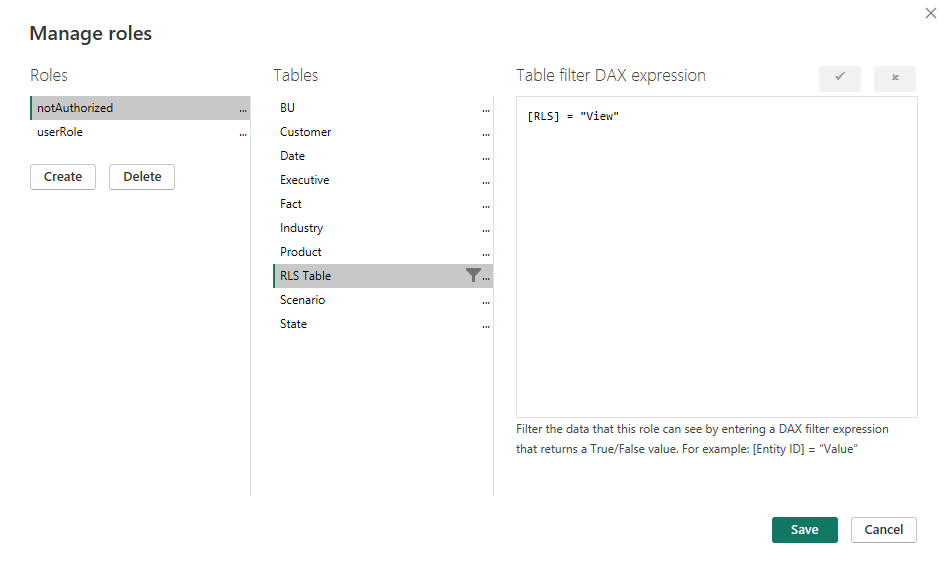
Create a new role that will not be authorized to see the report:
This is how the report should look like when you make the overlay card as big as the report:
Conclusion
Power BI is a powerful tool that empowers organizations to harness the full potential of their data. With the possibilities for embedding reports into applications, it is a valuable puzzle piece in our toolkit when it comes to efficiently implementing custom software solutions.