
Architecture as Code using C4 + PlantUML
Better code than draw, thanks to Structurizr
Self-employed advisor for a holistic view on the whole software engineering process. Developing people, developing organizations, developing software. Still passionate coder.
What is Architecture as Code?
For more than 4 years I'm a big fan of Simon Brown's C4-Model and its implementation Structurizr.
In short from his homepage:
The C4 model is an "abstraction-first" approach to diagramming software architecture, based upon abstractions that reflect how software architects and developers think about and build software.
and about Structurizr:
Structurizr builds upon "diagrams as code", allowing you to create multiple diagrams from a single model, using a number of tools and programming languages.
If you ask yourself why we need that, check this tweet and its comments:
Over the last couple of months, we've open-sourced some add-ons to the Structurizr Java-Client and its Export Library which provides some boilerplate code to easily create a modular model of your software architecture and then export it either to Structurizr Web or PlantUML.
Introducing Structurizr-AutoConfigure
If you follow the instructions of the default library, you easily end up with classes with 100s of lines of code without any structure. We've build Structurizr AutoConfigure which uses Spring Boot in order to
- cluster your C4 components into chunks of reasonable size
- separate model and view-generation from each other and ensure that views are only created after the model is fully initialized
- provide helper code that allows you to export your workspace either to Structurizr Web or to PlantUML files using C4-PlantUML.
This blog post will give you a step-by-step tutorial on setting up your project. You can also have a look at the sample project on GitHub for the full code.
Setup Gradle
My choice for dependency management is Gradle, but you can of course also use Maven. The only library you need is Structurizr-AutoConfigure, it takes care of all transitive dependencies for you.
repositories {
    mavenCentral()
}

dependencies {
    implementation("io.cloudflight.structurizr:structurizr-autoconfigure:1.0.1")
}
Configure the application
Next thing is to create a file called application.yaml inside the folder src/main/resources with the following content:
structurizr:
  workspace:
    name: My project name
    description: My project description
Change both the name and the description.
Create the main class
We are using Kotlin to create our C4 model, but you can also use Java. Still, we recommend Kotlin, it keeps the code much cleaner.
Create a file Architecture.kt first with the following content:
package io.cloudflight.architecture

import io.cloudflight.architecture.structurizr.SpringStructurizr
import org.springframework.boot.SpringApplication

@SpringBootApplication
class Architecture

fun main(args: Array<String>) {
    SpringStructurizr.run(Architecture::class.java)
}
We need this once to start Spring Boot.
Now we are ready to populate our model.
Create a simple C4 workspace
The idea is to create plain Spring @Components and wire them together. We are using a simplified version of the Cloudflight Coding Contest Platform to illustrate the usage of this library.
Populate your model
We are starting with our personas, we have a plain user and an admin.
@Component
class Personas(model: Model) {
    val user = model.addPerson(Location.External, "Contest Participant", "")
    val admin = model.addPerson(Location.Internal, "Administrator", "")
}
Please note that the Structurizr Model can be autowired into your components, it has been created by the StructurizrAutoConfiguration behind the scenes.
Next step is to create our SoftwareSystem and some Containers:
@Component
class CodingContest(model: Model, personas: Personas) {

    private val platform = model.addSoftwareSystem("Coding Contest Platform")

    init {
        val registration = platform.addContainer("Registration",
                "maintains all users and contests, provides SSO")
        val catCoder = platform.addContainer("CatCoder",
                "provides the possibility to solve coding challenges")
        registration.uses(catCoder, "fetches contests", "REST")

        with(personas.user) {
            uses(registration, "performs login")
            uses(catCoder, "solves coding challenges")
        }
        with(personas.admin) {
            uses(registration, "creates public contests")
            uses(catCoder, "maintains coding games")
        }
    }
}
We created two containers, injected our Personas component and wired everything together.
If you now run the application, nothing will happen, because we didn't create a view so far. That will be our next step:
Create views
Views in Structurizr have to be created before the model is fully initialized. As we modularized our C4 model into multiple Spring components, simply implement the interface ViewProvider with its method createViews. Structurizr-AutoConfigure will call this method after all models have been initialized.
@Component
class CodingContest(model: Model, personas: Personas) : ViewProvider {

    private val platform = model.addSoftwareSystem("Coding Contest Platform")

    init {
        // init the model like above
    }

    override fun createViews(viewSet: ViewSet) {
        viewSet.createContainerView(platform, "ccp", "Coding Contest Platform").apply {
            addAllContainersAndInfluencers()
            addAllPeople()
        }
    }
}
We get the ViewSet here and create a new ContainerView for our SoftwareSystem and add all containers and people to it.
Now we're ready to export our workspace in order to finally see some diagrams.
Export the workspace
Structurizr-AutoConfigure provides two export targets for your C4 workspace
- Export to Structurizr
- Export as PlantUML files
Export to Structurizr
The web server of Structurizr is the most powerful option to render C4 workspace. Create a user at https://structurizr.com/, there exist different pricing models (including an on-premise solution). After successful registration, create a new workspace there.
Then get back to your code and configure your app in the application.yaml:
structurizr:
   workspace:
      name: My project name
      description: My project description
   export:
      structurizr:
         enabled: true
         id: xxx
         key: "any"
         secret: "any"
This will configure a StructurizrClient as described in the docs. Take the id, key and secret from Structurizr.
Then run your application, your workspace will be synced to Structurizr. No need to create and configure a StructurizrClient on your own.
Go back to Structurizr now and have a look at your workspace. Activate the auto-layout functionality once and you will see a picture like that:
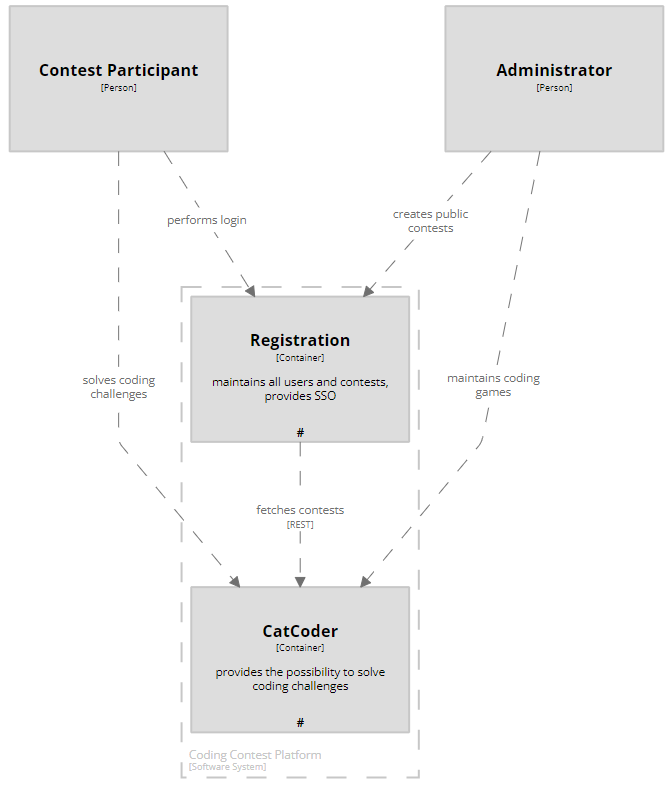
We won't go into detail here about numerous editing capabilities of the Structurizr Diagram Editor, you may have a look in the docs or even better: try it out yourself, it's really great stuff!
Export as PlantUML files
A second option to render your workspace is to export its diagrams as PlantUML files. There exist plugins for Intellij IDEA, Confluence and many other tools to transform those files into images. Simon has already published an export-library for PlantUML and we have released another one on top of that with some additional features, specifically targeting the great C4 PlantUML library.
In order to activate the PlantUML export, change your application.yaml as follows:
structurizr:
  workspace:
    name: "Coding Contest Platform"
    description: ""
  export:
    c4-plant-uml:
      enabled: true
Run the application again, it will print a file called build/c4PlantUml/ccp.puml with the following content:
@startuml
title Coding Contest Platform - Containers

top to bottom direction

!include https://raw.githubusercontent.com/plantuml-stdlib/C4-PlantUML/master/C4.puml
!include https://raw.githubusercontent.com/plantuml-stdlib/C4-PlantUML/master/C4_Context.puml
!include https://raw.githubusercontent.com/plantuml-stdlib/C4-PlantUML/master/C4_Container.puml


Person_Ext(ContestParticipant, "Contest Participant", "", $tags="Person+Element")
Person(Administrator, "Administrator", "", $tags="Person+Element")

System_Boundary("CodingContestPlatform_boundary", "Coding Contest Platform") {
  Container(CodingContestPlatform.Registration, "Registration", "maintains all users and contests, provides SSO", $tags="spring+Container+Element")[[https://register.codingcontest.org/]]
  Container(CodingContestPlatform.CatCoder, "CatCoder", "provides the possibility to solve coding challenges", $tags="spring+Container+Element")[[https://catcoder.codingcontest.org/]]
}

Rel_D(Administrator, CodingContestPlatform.Registration, "creates public contests", $tags="Relationship")
Rel_D(Administrator, CodingContestPlatform.CatCoder, "maintains coding games", $tags="Relationship")
Rel_D(CodingContestPlatform.Registration, CodingContestPlatform.CatCoder, "fetches contests", "REST", $tags="Relationship")
Rel_D(ContestParticipant, CodingContestPlatform.Registration, "performs login", $tags="Relationship")
Rel_D(ContestParticipant, CodingContestPlatform.CatCoder, "solves coding challenges", $tags="Relationship")

SHOW_LEGEND()
@enduml
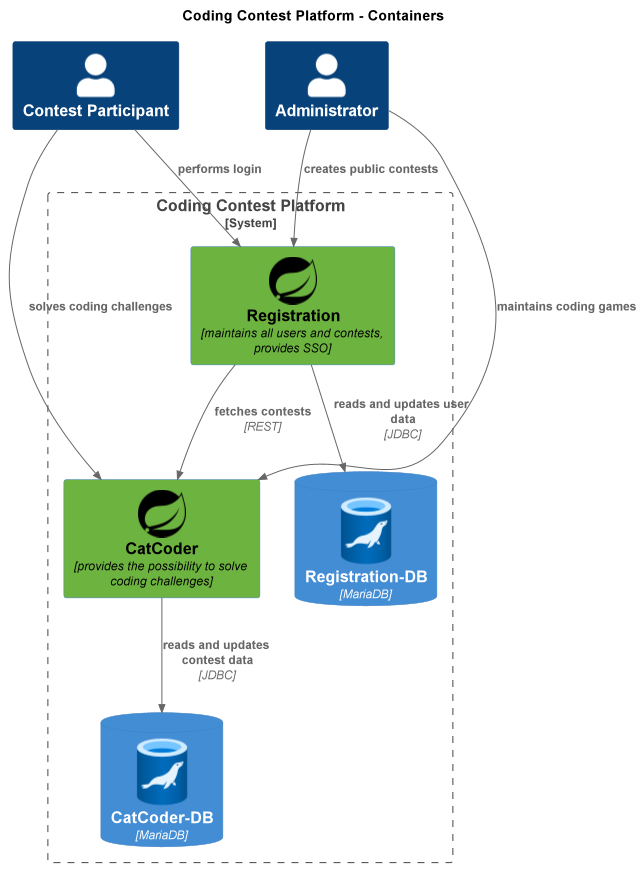
Use PlantUML to render that diagram into an image and you will get the following result:
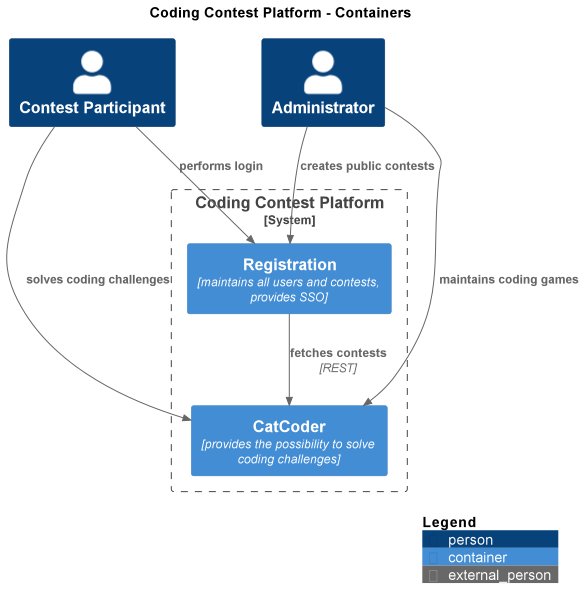
Please note that compared to the Structurizr version we didn't do any layouting here, PlantUML did that all for us. That's a pro and a con as well. While this might work fine for smaller diagrams, you'd easily be unhappy with the automatic layout of bigger layouts, and compared to Structurizr Web you don't have any possibilities here to influence the layout.
Advanced C4 models
You might think that what you've read so far sounds like a bit of overhead just to create this tiny diagram with 4 boxes and some lines. "I could have done that much faster with Visio, Powerpoint, or Draw.io". True.
But the real power of Structurizr/C4 comes when you create bigger, real-life models of your architecture. The following chapter gives you an impression of what I mean:
Creating multiple views from the same model
If you read the chapter Maps of your code on the C4-Model-Website, you understand the idea of having multiple views on the same model depending on the level of granularity.
The highest abstraction level is the SystemLandscapeView and to create that, we implement another ViewProvider
@Component
class ViewConfigurer: ViewProvider {
    override fun createViews(viewSet: ViewSet) {
        viewSet.createSystemLandscapeView("codingcontest", "").also {
            it.addAllElements()
        }
    }
}
The model stays the same.
Run the application and you will get the following additional diagram using the PlantUML-Exporter:

We don't care about the fact anymore that the Coding Contest Platform consists of two applications behind the scene, all we're interested in is the out-side-view.
Using Tags and Styles
Similar to CSS, you can add tags and styles to your workspace in order to group elements and also change their view representation. Extend the ViewConfigurer as follows:
@Component
class ViewConfigurer(workspace: Workspace) : ViewProvider {

    init {
         with(workspace.views.configuration.styles) {
              addElementStyle(MyTags.Database).shape(Shape.Cylinder)
              addElementStyle(Tags.PERSON).shape(Shape.Person)
          }
    }

    override fun createViews(viewSet: ViewSet) {
        // like before
    }
}

object MyTags {
   const val FileSystem = "FileSystem"
   const val Database = "Database"
}
Then we're adding new components to our CodingContest component with some of those tags:
@Component
class CodingContest(model: Model, personas: Personas) : ViewProvider {

    private val platform = model.addSoftwareSystem("Coding Contest Platform")

    init {
        // create registration and catCoder like before

        val catCoderDb = platform.addContainer("CatCoder-DB", "", "MariaDB").apply {
            addTags(MyTags.Database)
            catCoder.uses(this, "reads and updates contest data", "JDBC")
        }

        val registrationDb = platform.addContainer("Registration-DB", "", "MariaDB").apply {
            addTags(MyTags.Database)
            registration.uses(this, "reads and updates user data", "JDBC")
        }
    }
}
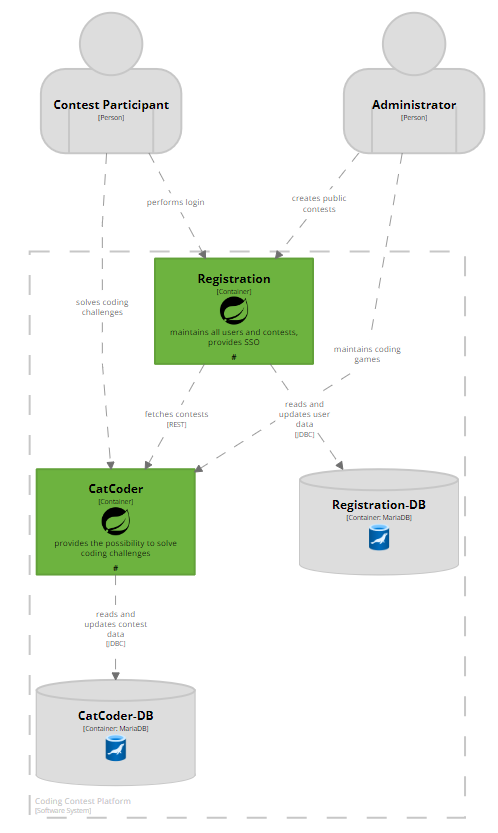
This will give you the following picture:
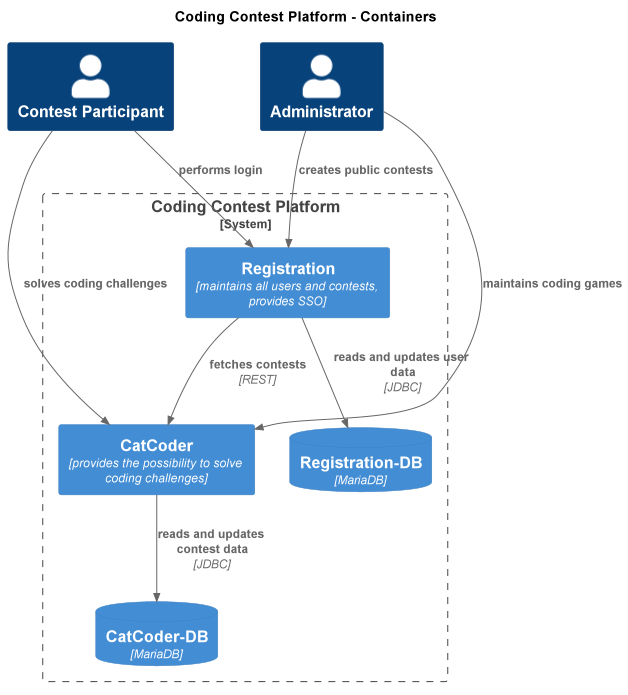
You see that the styles of the database components have been applied and they are showing as cylinders. And even better, without changing the model, you could create another view that excludes all databases only from that new view:
@Component
class CodingContest(model: Model, personas: Personas) : ViewProvider {

    override fun createViews(viewSet: ViewSet) {
        viewSet.createContainerView(platform, "ccp", "Coding Contest Platform").apply {
            addAllContainersAndInfluencers()
            addAllPeople()
        }

        viewSet.createContainerView(platform, "ccpNoDB", "Platform without DB").apply {
            addAllContainersAndInfluencers()
            addAllPeople()
            removeElementsWithTag(MyTags.Database)
        }
    }
}
The important line here is removeElementsWithTag(MyTags.Database) on the second view. While the view ccp will render all containers (including the databases) as shown above, the new view ccpNoDB will omit all components with the tag Database. Still, they are operating on the same model, which means if another ApplicationServer or a new dependency is added to the model, you will see that on both diagrams.
Adding Icons
In the early years of Structurizr I often heard the argument that one can draw much more beautiful diagrams with other tools, especially when it comes to icons. Latest since Structurizr supports Themes, this is not true anymore. You can use those themes for target platforms like AWS, GCP, or Azure out-of-the-box and have great styling including coloring and icons.
To give a bit more assistance and type-safety, we published the Architecture-Icons library, which is provided as a transitive dependency of Structurizr-AutoConfigure.
To make use of it, you just have to add the theme to your styles object and then use the tags from that library:
import io.cloudflight.architectureicons.azure.AzureMonoIcons
import io.cloudflight.architectureicons.tupadr3.DevIcons2

@Component
class ViewConfigurer(workspace: Workspace) : ViewProvider {

    init {
         with(workspace.views.configuration.styles) {
              addElementStyle(MyTags.Database).shape(Shape.Cylinder)
              addElementStyle(MyTags.FileSystem).shape(Shape.Folder)
              addElementStyle(Tags.PERSON).shape(Shape.Person)
              addElementStyle(DevIcons2.SPRING.name)
                    .background("#6DB33F").color("#000000")
          }

          with(workspace.views.configuration) {
              addTheme(AzureMonoIcons.STRUCTURIZR_THEME_URL)
              addTheme(DevIcons2.STRUCTURIZR_THEME_URL)
          }
    }

    // createViews

}
Themes have been added here, and we also introduced a new ElementStyle called DevIcons2.SPRING. Now add some tags to our components:
@Component
class CodingContest(model: Model, personas: Personas) : ViewProvider {

    private val platform = model.addSoftwareSystem("Coding Contest Platform")

    init {
        val registration = platform.addContainer("Registration", "").apply {
                addTags(DevIcons2.SPRING.name)
        }
        val catCoder = platform.addContainer("CatCoder", "").apply {
            addTags(DevIcons2.SPRING.name)
            registration.uses(this, "fetches contests", "REST")
        }

        val catCoderDb = platform.addContainer("CatCoder-DB", "", "MariaDB").apply {
            addTags(
                 MyTags.Database,
                 AzureMonoIcons.Databases.AZURE_DATABASE_FOR_MARIA_DB.name
            )
            catCoder.uses(this, "reads and updates contest data", "JDBC")
        }

        val registrationDb = platform.addContainer("Registration-DB", "", "MariaDB").apply {
            addTags(
                 MyTags.Database,
                 AzureMonoIcons.Databases.AZURE_DATABASE_FOR_MARIA_DB.name
            )
            registration.uses(this, "reads and updates user data", "JDBC")
        }
    }
}
This will create the following PlantUML diagram:
Of course this also works perfectly fine in Structurizr Web:
And again, here you have the big advantage of much more styling options and manual layouting, which does not work with PlantUML.
Full Example
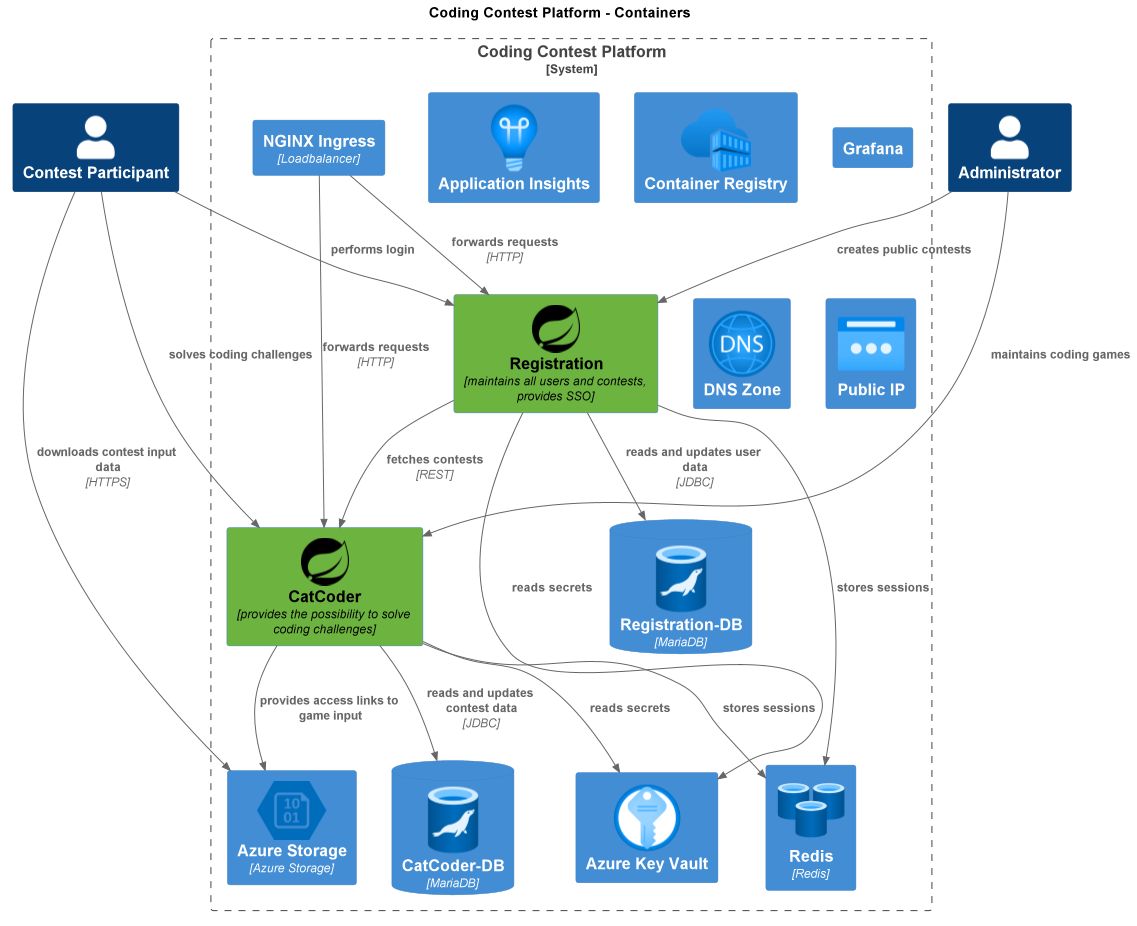
If you have ever worked with Azure or any other hyperscaler then you know that nowadays things are much more complicated. No problem with Structurizr/C4, simply add all containers and wire them together, you might end up with a ContainerView like that:
You can also create separate Deployment Diagrams based on the same model:
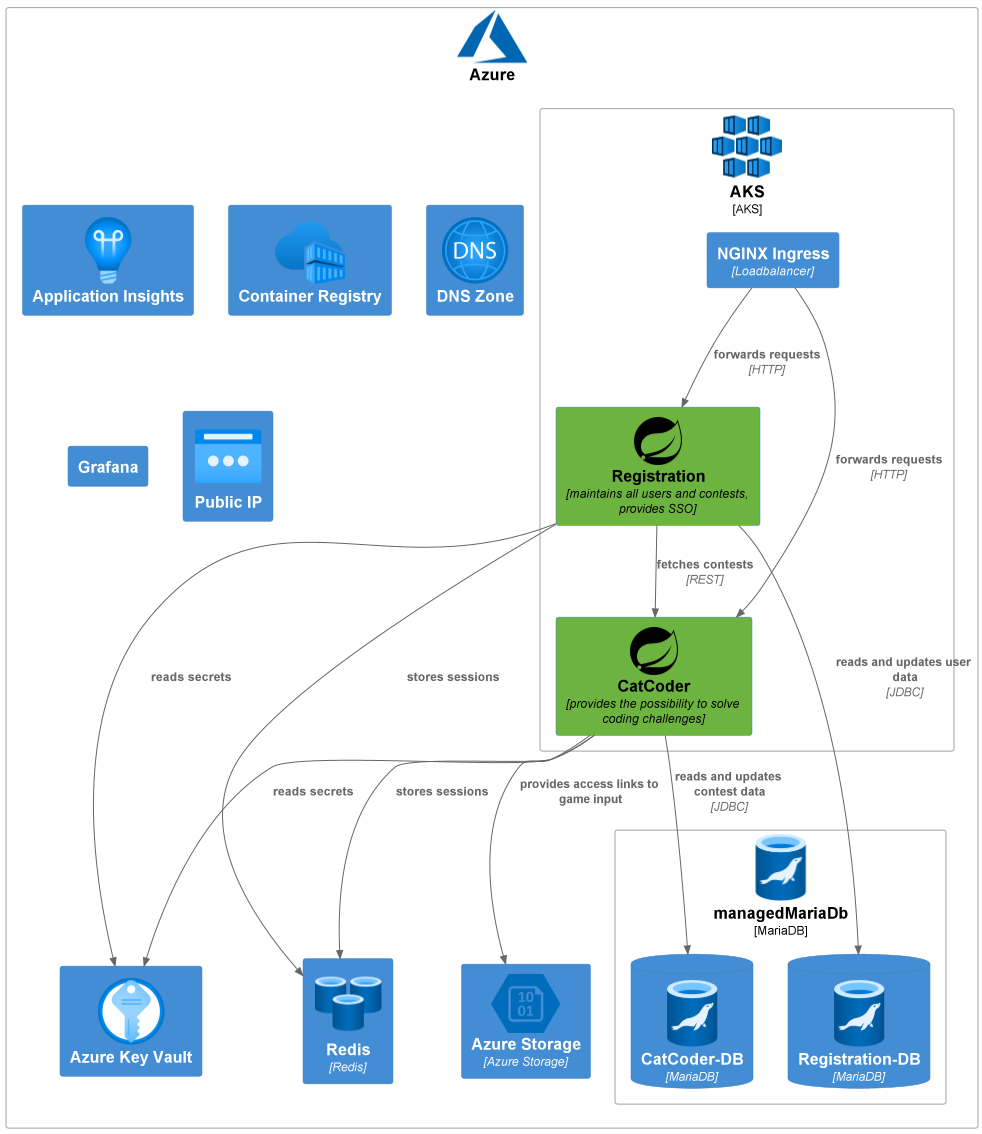
Please note that this diagram still does not reflect 100% of reality and lots of dependencies are missing here - I just didn't wanna create too much noise here just for demonstration purposes.
Find the full code example on GitHub:
Summary
Although the initial setup comes with a bit of time-invest and you also need some rudimentary coding-skills, maintaining your software architecture as code comes with a lot benefits, especially when your software systems grow:
- Code means version-control, therefore history over time.
- You can programmatically create your model and your views (with loops, if-clauses and all of that stuff).
- You can create different views on the same model. All changes on the model are reflected to all views. You always have a consistent picture.
- You can even create the architecture model automatically from code.
- You can export to different target systems.
While different tools exist, Structurizr is our preferred choice. Check it out!