


At Cloudflight, we recently moved our on-premise build infrastructure to Azure. This includes GitLab, TeamCity, Nexus and a lot of other supporting services, enabling us to build software the way we do. Most of these services were already running on OpenShift which made the migration pretty painless and straightforward but our GitLab instances were running on virtual machines to avoid complicated networking setups concerning SSH in OpenShift.
This blog post outlines the path we took, the decisions we made and the challenges we encountered while moving these GitLab instances to a Kubernetes-based setup. It should not serve as a guide, but help you on your journey moving GitLab to the cloud.
Requirements and Constraints
Before designing the target architecture, we have to analyze the requirements and constraints.
The hard constraints (i.e. non-negotiable) in our case were:
Only allow access from our company network
No difference should be noticeable for end users (this means changing URLs/ports is a no-go)
Have all services be zone-redundant
Other requirements include:
Cost-Effective resource sharing with other services
Utilize hosted offerings whenever it makes sense
Minimized latency to our offices
Additionally, we can use this opportunity to pick up some new possibilities along the way like zero-downtime upgrades.
Current Architecture and migration targets
At the start of this journey, we were operating two self-hosted GitLab instances. One of these is older and was set up at a time when we had comparatively few projects and employees. The other one is newer and contains the majority of our active projects. The newer instance is completely automated regarding user/repo management while the older one is a chaotic mess of manually created repositories, groups and assigned permissions. Our long-term goal is to move all projects off the old instance to the new one but as we, as site reliability engineers, know: permanently turning off a service is harder than one thinks.
This setup gives us one advantage: we can first migrate the older, less important instance and iron out the bugs before migrating the business-critical one.
Both instances are running the official gitlab-ce container using podman and are connected to a fast PostgreSQL database.
For this post, I'll refer to these instances as gitlab-legacy and gitlab-current respectively
Target Architecture: First Iteration
To figure out where to begin, the first step is a rough architecture overview. This is not final and intended to evolve but visualizing the "big-picture" shows us where to focus and what challenges we might encounter.
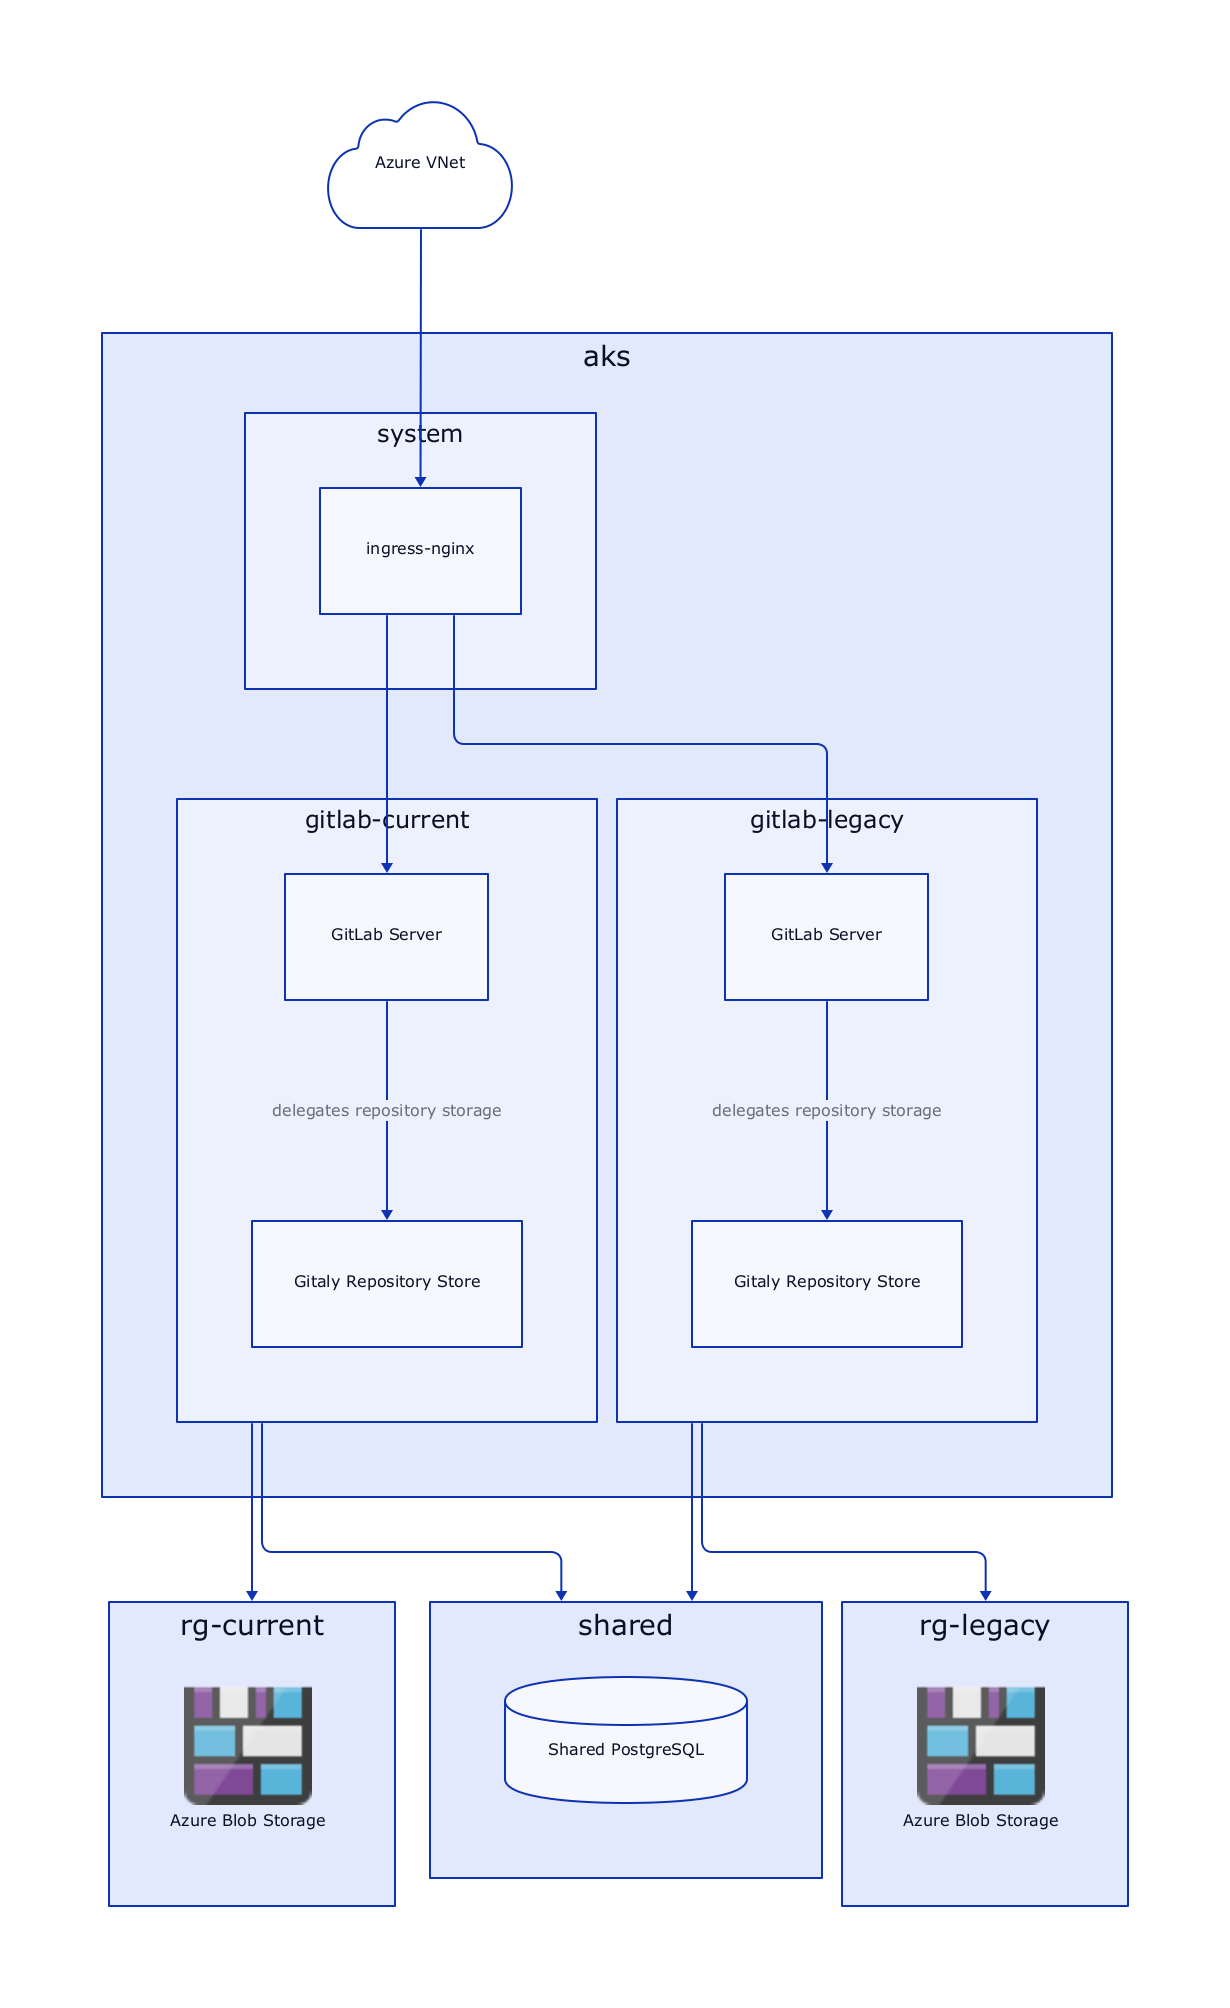
I sketched out the first iteration pretty quickly and without looking too much into the technical details (this will come back to bite us later). My goal for this iteration was to set up a cluster, run GitLab on it and connect it to our network.
Now that we know what services we're going to use - let's provision them and see how far we get with this current design!
Configuring Azure
Our tool of choice for cloud configuration is Terraform, so we first created a module setting up shared services (AKS, VNet, Terraform State) and a separate one for GitLab-specific resources (PostgreSQL, Redis, Storage Accounts).
As most of our offices are located in the DACH area, I chose germany-west-central as the target Azure region.
AKS VNets
To connect AKS to the target VNet, the node pool needs to be in a subnet, contained in the virtual network. It would be possible to route between VNets, but this costs per GB, and we're trying to optimize for cost. To peer with our company network, we only have a /24 netmask available. As we also want to have other services on that virtual network, I split the network into two /25 blocks. The first 128 Addresses are reserved for the AKS nodes, while the rest can be used for Services. Services include Azure resources like Redis and PostgreSQL but also exposed services such as the ingress controller of our cluster.
After spending a morning, putting my architecture diagram into code, I ran into the first issue…
Message="The VM size of AgentPoolProfile:default is not allowed in your subscription in location 'germanywestcentral'
Where Instances?

As it turns out, the germany-west-central region is currently out of resources. Even though the cloud is supposed to scale with your needs and enable dynamic workloads, at the end of the day, it's just other computers.
At this point, the advantages of Infrastructure as Code come into play. By changing ger-west-central to eu-west, our entire infrastructure is now provisioned on a new region.
Future me talking: Due to unforeseen delays in the migration, we actually managed to request resources on germany-west-central (at least in one subscription) so do not be confused if you see references to
gwcin the rest of the article.
Supporting resources
This is the easiest part of the whole ordeal. As we will need to support two GitLab Instances, I created a terraform module that contains storage accounts, containers, databases and caches. This module then gets included twice in our main terraform repository - once for each instance.
During the setup of these resources, we noticed especially high costs associated with Azure Cache for Redis because the premium tier is the smallest tier with Zone-Redundancy. Since setting up HA Redis is pretty simple (in contrast to Postgres) and the data is not critical, we decided to deploy Redis in Kubernetes instead.
Secret management
At some point, our cluster would love to handle some secrets but most of our confidential resources (PostgreSQL, Redis, Storage) reside outside AKS. This means we have to bridge the gap between the Terraform and Kubernetes worlds.
The azure-native way for this lies in the Azure Key Vault Provider for Secrets Store CSI Driver which is not only a very long name but also a project to provide KeyVault secrets in Kubernetes.
The Azure documentation tells us to use the az CLI to enable the add-on for the cluster but as we want to be code-driven, this is not an option. The terraform module does not support enabling add-ons, so we drop one level deeper and install the addon ourselves. Lucky for us, the AKS addons are simply helm charts that can be provisioned by any cluster admin. More on how we configure the helm chart later.
After the addon is provisioned, pods can either mount the secrets directly or reference a secret, which is created on the fly.
Configuring Kubernetes
The preferred way to set up GitLab on Kubernetes is the GitLab Helm Chart. An operator is in the works, but as it is helm-based, we do not gain any advantages by using it in our case.
As seen in the documentation, the chart includes a lot of other components. Some of those we want for both instances (most of the core components) while others we want to share between the tenants (e.g. certificate handling).
At this point, our first architecture draft comes back to haunt us. The reason why the GitLab chart includes its own ingress controller is port 22. In the original architecture, we use one shared ingress controller for both instances. This won't work, as each GitLab instance expects itself to be available at port 22 for SSH traffic. This is configurable of course, but we want to minimize friction and meet the expectation of developers, that SSH cloning works without specifying a port.
So back to the drawing board it is!
Target Architecture: Second Iteration
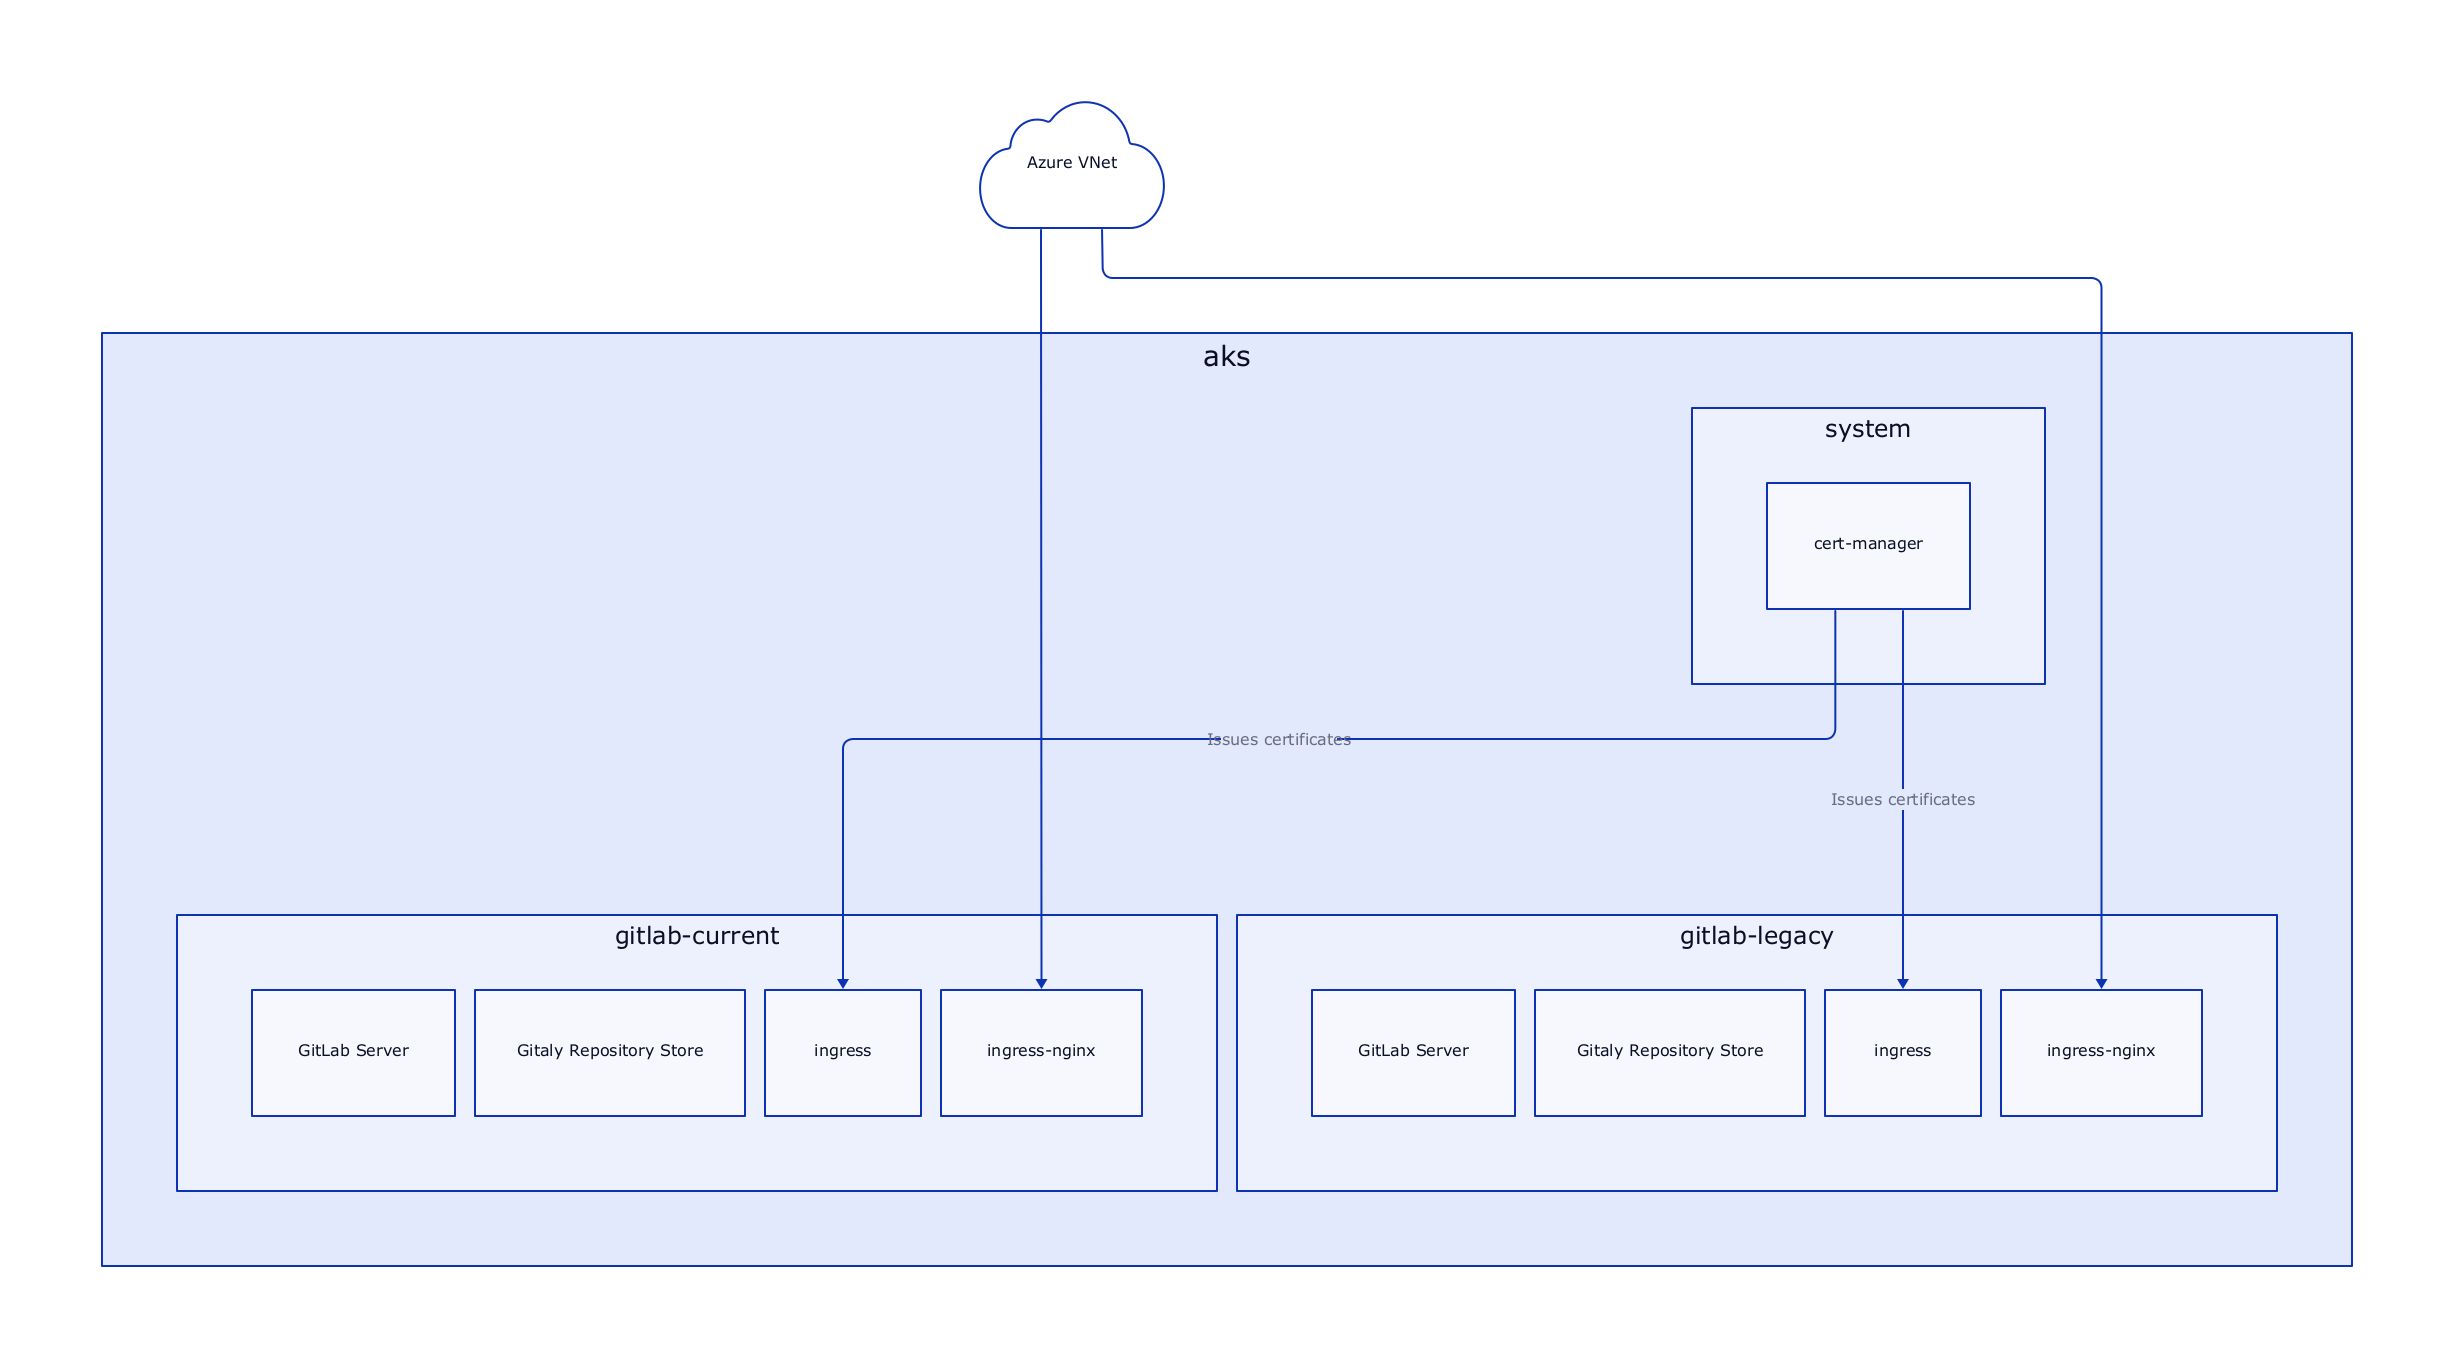
This new architecture splits up the ingress controller into two. Each of these instances has its IP Address inside the Azure VNet and is thus able to independently forward port 22 to the correct instance.
To specify the IP Address for the ingress controller, the following annotation can be used on the service
'service.beta.kubernetes.io/azure-load-balancer-internal': 'true'
'service.beta.kubernetes.io/azure-load-balancer-internal-subnet': '<subnet-name>',
Getting rid of YAML
Yes - we're going to configure Kubernetes without YAML. You might ask how and the answer is Jsonnet! Jsonnet is a data-templating language that allows us to reuse and simplify configuration. To apply the configuration we utilize tanka, a wonderful tool developed by the folks at Grafana Labs.
You might also wonder why we do not simply use helm. This is best explained in the Tanka documentation:
Helm relies heavily on string templating
.yamlfiles. We feel this is the wrong way to approach the absence of abstractions inside YAML, because the templating part of the application has no idea of the structure and syntax of YAML.…
Jsonnet on the other hand has got you covered by supporting mixing (patching, deep-merging) objects on top of the libraries output if required.
But we intend to use the GitLab helm chart - how does this work? Fear not! Tanka has a solution for that. Tanka ships with support for Helm. This works by calling helm template during the evaluation of the jsonnet code. This allows us to configure the helm chart using jsonnet, render it, and then customize it further - again using jsonnet.
Now that we've clarified how our configuration will be done, let's get to configuring some stuff!
Initial repository setup
For the initial setup, a simple call to tk init suffices. This creates the required folder structure, and sets up dependency management using jsonnet-bundler.
We'll structure our deployment into three environments. In tanka terminology, environments are separated configuration units. In our case the following environments allow us to have a clean separation of concerns:
environments/infrastructure: Contains shared components like the cert-manager or kuredenvironments/gitlab-legacy: Contains the configuration for the legacy GitLab instanceenvironments/gitlab-current: Contains the configuration for the current GitLab instance
Each of these environments is scoped to its respective namespace. Now let's fill these environments with some resources!
The infrastructure environment
As we intend to reuse this cluster for different applications, it would be highly inefficient to have each application provide its own way of managing certificates. So our first order of business is to install cert-manager in our cluster. We can use the cert-manager jsonnet mixin provided by Grafana, which greatly simplifies things.
Another thing we'll put in the infrastructure environment is the previously mentioned CSI Secret Provider. This is our first contact point with the tanka helm integration so let's take a closer look.
First, we have to download the helm chart. The tk tool contains a handy utility to do this for us:
# initialize a chartfile used for dependency management
tk tool charts init
# add the repo
tk tool charts add-repo azure-secrets-csi https://raw.githubusercontent.com/Azure/secrets-store-csi-driver-provider-azure/master/charts
# add the chart
tk tool charts add azure-secrets-csi/csi-secrets-store-provider-azure@1.0.1
# download all charts specified in the chartfile
tk tool charts vendor
Now we can build our reusable library component. By conventions, these go into the lib directory. The configuration is pretty straightforward as the helm chart does not require much configuration:
local tanka = import 'github.com/grafana/jsonnet-libs/tanka-util/main.libsonnet';
local helm = tanka.helm.new(std.thisFile);

{
  csiSecretsStoreProvider: helm.template('aks', '../charts/csi-secrets-store-provider-azure', {
    namespace: 'kube-system',
    includeCrds: true,
    values: {
      'secrets-store-csi-driver': {
        syncSecret: {
          enabled: true,
        },
      },
    },
  }),
}
This can then be referenced by our environment main.jsonnet:
(import 'secrets-store-csi-driver.libsonnet')
And that's it! When executing tk apply environments/infrastructure the helm chart will be rendered, parsed and injected in the correct location.
Configuring GitLab
Now that everything is up in place, we'll need to configure GitLab to work with our stack. Under the confusing name command-line-options.md we find the best documentation for configuring the helm chart. Let's go through the things required to get our stack up and running.
The following customizations all take place in the values of the helm chart
Disabling things not needed
In the global section, we need to disable a few things not required as they have been replaced by Azure offerings or shared instances:
{
  global: {
    ingress: {configureCertmanager: false},
    kas: {enabled: false},
    minio: {enabled: false},
  }
}
Sadly, the helm chart has a lot of locations where we need to disable things. These are the other parts:
{
  certmanager: {install: false},
  'gitlab-runner': {install: false},
  postgresql: {install: false},
  registry: {enabled: false},
}
Depending on your needs, you might want to keep some of these components enabled.
Connecting to Azure services
As outlined at the top, we want to use managed services where possible. The connection to Azure blob storage is established like this:
{
  global: {
    appConfig: {
      object_store: {
        enabled: true,
        connection: {
          secret: $.secretName,
          key: 'objectstore-connection',
        },
      },
      lfs: {
        enabled: true,
        proxy_download: false,
        bucket: 'lfs',
      },
      artifacts: {
        proxy_download: false,
        bucket: 'artifacts',
      },
      uploads: {
        proxy_download: false,
        bucket: 'uploads',
      },
      packages: {
        proxy_download: false,
        bucket: 'packages',
      },
      externalDiffs: {
        proxy_download: true,
        bucket: 'external-diffs',
      },
      terraformState: {
        bucket: 'terraform-state',
      },
      ciSecureFiles: {
        enabled: false,
      },
      dependencyProxy: {
        enabled: false,
        bucket: 'dependency-proxy',
      },
    },
  }
}
For this to work, a secret containing the connection string must exist. In our case, this secret is provisioned by the CSI Secret Store Provider. Configuring this in detail is out of the scope of this article but might be the topic of a future post so stay tuned.
The connection string has the following format:
provider: AzureRM
azure_storage_account_name: <storageaccountname>
azure_storage_access_key: <access key>
azure_storage_domain: blob.core.windows.net
PostgreSQL is set up in a similar manner:
{
  psql: {
    host: $._config.gitlab.dbHost,
    password: {
      secret: $._config.gitlab.secretName,
      key: 'database-password',
    },
    username: $._config.gitlab.dbUser,
    database: $._config.gitlab.dbName,
  },
}
After applying this configuration, we were greeted with a fresh GitLab instance!
Moving data
Now that GitLab is set up, we need to get the date there somehow. The way to go here is to follow the official migration guide.
Since importing large GitLab instances can take quite some time, we have to adapt the import process a bit. The documentation instructs us to run kubectl exec <Toolbox pod name> -it -- backup-utility --restore -t <timestamp>_<version> but if the import takes longer than the configured Kubernetes API timeout (default 10 minutes), you'd have to manually interact with the session every few minutes. Having the process run detached from the connection would be okay, but unfortunately, the last steps of the import ask for interactive confirmation. We also want to track the progress somehow so having a persistent session available would be of great use. To accomplish this, we can either use a custom toolbox image (the clean way) or run the toolbox as root and install tmux/screen in the running container (the easy way).
As we're already using Azure blob storage for the GitLab data, we can reuse this to transfer the backup. The easiest way I found was to upload the backup archive using azcopy and a Shared Access Signature (SAS). By using Shared Access Signatures we avoid storing any long-lived credentials on the machine. Shared signatures can also be used during the restore process as the GitLab backup-utility supports loading backups from a remote URL.
Testing HA
With a running GitLab instance, we can now check if our availability requirements hold. For managed services like PostgreSQL and Blob Storage, we have to trust Microsoft. Testing zone failure in AKS however is quite simple. We just have to shut down all instances in one region. This can be done in the Virtual Machine Scale Set.
So let's do that!

A glance at our pods shows us that some of the GitLab containers were scheduled in the same zone which is a no-go! To prevent this, the following has to be set in the values:
{
  antiAffinity: 'hard',
  affinity: {
    podAntiAffinity: {
      topologyKey: 'topology.kubernetes.io/zone',
    },
  },
}
After retrying the failover with correctly scheduled pods, we at least get a response from GitLab instead of a generic 502 response from nginx. Taking a closer look reveals two pain points: Redis and Gitaly
Redis
As described at the top, we did not want to use a managed offering for Redis. As a tradeoff, we now have to take care of HA ourselves. The Redis subchart did not work well when we tried it so we substituted it for our own Redis HA Module. This configures a Primary/Replica setup with sentinel to switch over in case of failure.
Gitaly (or the curse of GWC)
The Gitaly component is used by GitLab to store and retrieve repository data. In the default setup, it is set up as a single replica statefulset which would be fine in most situations as the pod could restart in a different zone and mount the same storage. Sadly, the Germany-West-Central region is missing a crucial feature: Zone-Redundant Storage. This means that once storage is provisioned, it is now locked to a specific zone. Obviously, this will not work for us, so we have to fix this at the application level and configure gitaly to be highly available. The abstraction layer responsible for replicating repository data is called Praefect and it requires a separate database. Praefect handles distribution/replication in a Gitaly cluster and can be set up using the Helm chart:
{
  praefect: {
    enabled: true,
    psql: {
      host: $._config.gitlab.dbHost,
      user: $._config.gitlab.dbName + '_praefect',
      dbName: $._config.gitlab.dbName + '_praefect',
      sslMode: 'require',
    },
    dbSecret: {
      secret: $._config.gitlab.secretName,
      key: 'praefect-password',
    },
    virtualStorages: [
      {
        name: 'default',
        gitalyReplicas: 2,
        maxUnavailable: 1,
      },
    ],
  },
}
This does not migrate data however so the simplest approach is to tear down the resources and perform the migration again.
After these changes, High availability works without any downtime and only a few dropped requests while Redis is electing the new leader.
TOFU, but not the good kind
After performing the migration, everything looked fine at first until we tried the first git clone.
@@@@@@@@@@@@@@@@@@@@@@@@@@@@@@@@@@@@@@@@@@@@@@@@@@@@@@@@@@@
@    WARNING: REMOTE HOST IDENTIFICATION HAS CHANGED!     @
@@@@@@@@@@@@@@@@@@@@@@@@@@@@@@@@@@@@@@@@@@@@@@@@@@@@@@@@@@@
IT IS POSSIBLE THAT SOMEONE IS DOING SOMETHING NASTY!
We certainly didn't do anything nasty so what changed? The underlying transport of git clones, SSH, uses a trust model called Trust On First Use (TOFU). This means, that the first time you connect to a host its host key gets stored in your .ssh/known_hosts. A crucial detail the GitLab migration guide misses out on is that the SSH Host Keys do not get restored during the restorations.
To migrate the SSH keys, edit the gitlab-gitlab-shell-host-keys secret and replace the values with the appropriate keys. If you're coming from a docker-based installation, these files can usually be found in the volume mounted to /etc/gitlab, next to the gitlab.rb file. Afterwards, delete the gitlab-shell pods to reload the keys from the secret. Now the developer and CI machines see the same key they're used to.
Conclusion
Depending on your setup and needs moving GitLab to the cloud can seem like a daunting task. However, the excellent migration guide combined with the flexibility of the Helm Chart can make this a breeze. The migration is well worth it with easy scaling, zero-downtime updates and high availability with minimal effort. We hope this guide helps you find your ideal setup and makes you aware of any potential pitfalls and hope your migration goes well!